Hi. My name is Jess, and I'm slightly in love with Pinning.
Pinterest is my new found obsession... I love all the creativity that is flowing around those boards, some super smart, some super creative, and some just so darn cute! A few weeks ago I decided that it was time to tackle one of the many crafty ideas I had pinned onto my
bedroom board, New DIY headboards for our bedroom. Which go adorably with our new bed from
here! So, I went out around Boise, in search of the perfect supplies for my project, wood, batting, and a beautiful fabric. We already had the staple gun and staples (Brent actually has 3 staple guns...) and I ended up having to go back to JoAnn Fabrics for hangers... but after 2 trips out for forgotten supplies, I was finally able to put these beautiful new pieces of art together. So, here's how it went...
 |
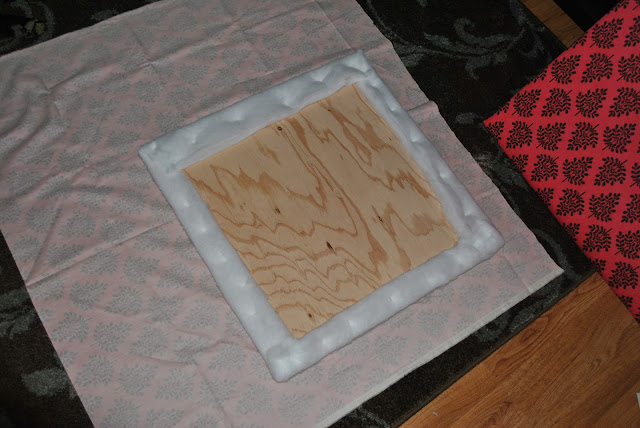
| Lay boards out along folded batting. I used a king size extra fluffy bag of batting, folded into 3rds, and then laid out my 4 24"x24" pieces of half inch thick plywood, being sure to space them a few inches apart, then cut and smooth batting. |
 |
| Fold batting along edges and staple with gun, I used alternating staples, horizontally and vertically, just in case some decided to pull. |
 |
| Smooth the batting somewhat taught as you go along, so you don't leave creases or wrinkles on the front. |
 |
| When your all done, you can trim the excess batting to make sure it's not too bulky. Also trim the corner folds so they are not too bulky either. |
 |
| Finished batting covered boards! |
 |
| lay your fabric (I used a twill style thicker upholstery fabric) print side down on the floor, you can iron if it is especially wrinkly, I didnt as you can see above... but it smooths out when you pull and staple it tightly. |
 |
| Be sure if you have a print that it is laid level along the print, I didn't on the first one and had to redo part of it... |
 |
| Fold fabric over batting, and staple at the edge of the batting, so there is a nice little tuft along the edge of the board. I put staples every inch to inch and a half apart, just to be sure it wouldn't tear or pull. |
 |
| Staples placed about an inch and a half apart. Continue folding fabric along each side, tucking corners in at the end. I forgot to take pictures of how I tucked the corners, i'll add those when I finish the last two boards this weekend. |
 |
| Some of the finished boards!!! |
 |
I chose two contrasting colors, they look so great staggered on the wall!!
|
I'll be hanging and finishing up this Pinterest project this coming weekend, Stay tuned and check back in a few days for the final reveal! :)


1 comment:
I can't wait to see the final results of this project! I've been dying to do this-- our bed looks so weird without a headboard!
Post a Comment